
Technical Tip
For information on setting up a UTBox account, contact your Micronet account manager.
If your company has a UTBox account, you can send faxes (such as invoices, statements and reports) directly from Micronet to your customers’ fax machines. You do not need to use, or even have, a fax machine of your own. When Micronet users process invoices, statements or reports, Micronet saves the documents in PDF format and then sends them to UTBox which sends them on to the appropriate customer fax numbers.
|
|
|
Technical Tip For information on setting up a UTBox account, contact your Micronet account manager. |
|
|

|
Reference For information on setting up Micronet so reports are automatically e-faxed to the appropriate recipients, refer to "Report Options - EFax (v2.8)". |
To fax an inquiry or report via email:
Micronet displays the Select Paper screen.
Micronet displays the Save As screen.

Micronet displays the Font screen.
Micronet displays the Address Email screen.
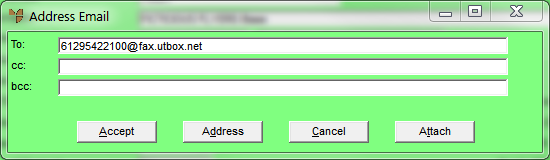
You must add "@fax.utbox.net" after the fax number, e.g. 61295422100@fax.utbox.net.
You can also select email addresses by choosing the Address button.
Micronet displays the List of Attachments screen.

This screen displays the following details:
|
|
Field |
Value |
|
|
Attachments |
Micronet displays the path and filename of your saved inquiry or report. |
|
|
Subject |
Micronet displays the report name as the subject of the fax/email. You can change this if required. |
|
|
Body |
Micronet displays the text "See attachment". You can enter any information you want added to the fax. |
Micronet redisplays the Address Email screen.
Micronet faxes your inquiry or report to the recipient(s) you specified, then redisplays your original screen.